
This is the fourth anglaise I've made. On my first three, I wasn't really happy with how the skirt pleats sat under the back pleats. My Marie Antoinette dress was supposed to have an en fourreau back, but a cutting mistake paired with frustration of the skirt pleats not sitting how I wanted them to changed that plan.
This meant that I put a lot more thought into this dress than I usually do before starting a project, and I came to the conclusion that doing the dress backwards--pleat the skirt, and then pleat the back pleats--would be easier.
This tutorial starts with a fitted lining. My fitted lining is an altered version of my stripey dress with a fitted back and separate skirt.
The dress I'll be using for the tutorial is made with absolutely lovely cotton/wool Virginia cloth from Burnley and Trowbridge. It has a stomacher front, but changing it to a closed front doesn't alter the construction--just cut the appropriate front pieces.
Here's a totally not to scale version of what my lining looks like. I recommend looking at the anglaise patterns in Costume Close-Up, Fitting and Proper, and Patterns of Fashion 1. The latter two show dresses with closed fronts, Costume Close-Up shows a gown with a stomacher.

Step one--Make your lining. I failed to take a picture of my lining, but it's nearly identical to the lining for my robe a la francaise. There are two differences--the anglaise lining doesn't lace up the back, has a slight point at the back waist, and instead of darts, I used separate shoulder pieces.
Step two--Cut your back fabric. Again, I neglected to take a picture. So, you're treated to my *lovely* artwork :)
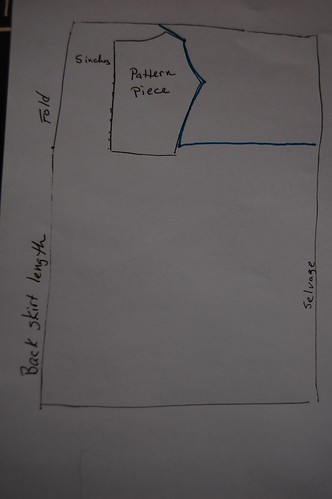
Place your back pattern piece about five inches from the fold and about an inch from the top. Cut on the blue lines as shown in the drawing. The extra space above the shoulder and starting the skirt about an inch above waist will give you a little wiggle room--it's easy to trim it away later!
If you're using skirt supports--I'm not in this dress--you can angle the top skirt seam up to make room for them.
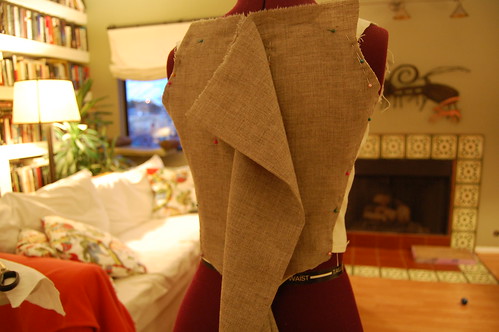
Step Three--Put your lining on your dressform. Your dressform does not need to fit. Mine is approximately my measurements and one shoulder is a good one inch higher than the other. Your lining fits--so will the dress!
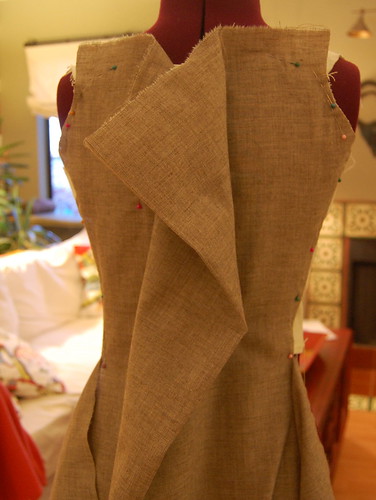
Pin the fabric to the lining. Start by pinning it to the shoulder and side seams. You'll have about 10 inches of extra fabric. Smooth the fabric towards the middle, and pin in random places on the back to keep it smooth.
Once you've smoothed the back, pin the excess fabric out. You're going to ignore this for now.
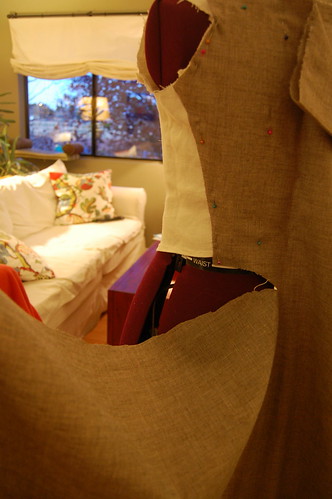
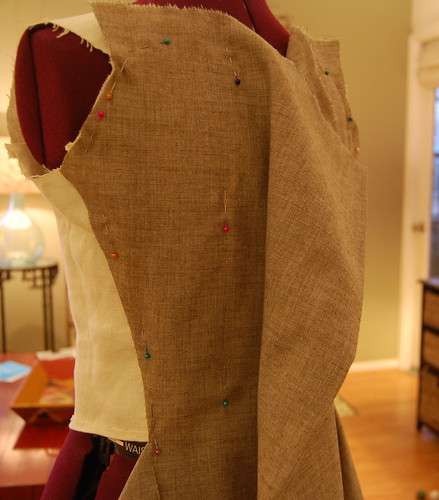
Cut! This part is, admittedly, a little frightening, but doing it this way means you've cut in the right place. Cut, using your lining as a guide, about one quarter to one half an inch below the lining. Once you get past the curved part, taper it so it's about the same length as the lining. This allows you to turn up the edge to cover the pleats. This is the method used on the gown in Costume Close-Up
And here it is--cut on both sides!
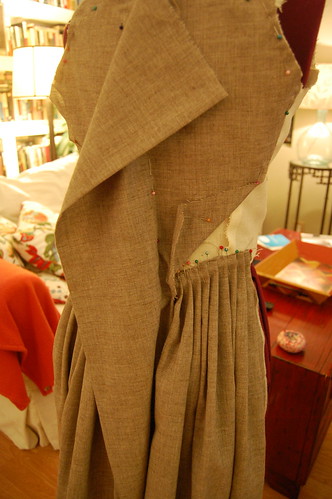
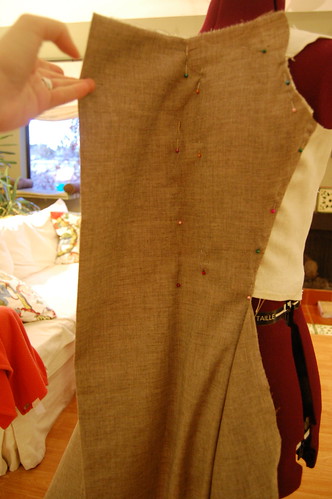
The next step is to pleat the skirt to the linen lining. Pin the outer fabric out of the way for this. I found it easier to do this off the dressform. As you can see, we're still ignoring that ten inches of fabric in the center.
Next, sew the pleats to the lining. Sorry, I don't have pictures, but it is easy. I sewed the pleats down in two places--a running stitch at the top of the pleats to hold them in place, and I whipstitched them to the bottom of the lining.

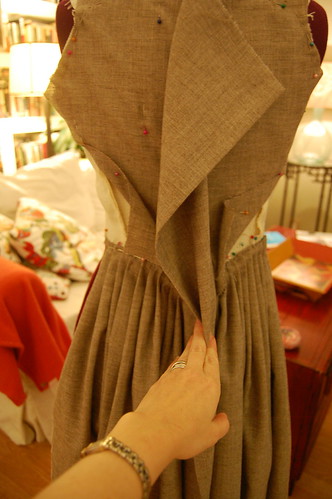
Put the dress back on the dressform, smooth the outer fabric over the pleats, and fold up the edge. Pin in place, and sew. Stop stitching about one inch from the side seam. This is important later! I used a spaced backstitch for this. I did this directly on the form.
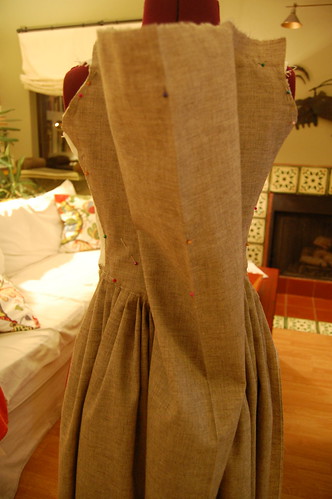
Repeat! And now it's time to loosen the fabric you have in the back. Be sure to mark the center--pins are probably the easiest way to do it!
This tutorial will now continue in part two...
Beautiful! I've always wanted a gown.
ReplyDeleteThank you!
DeleteI have a question for you - if you are cutting the edge for the skirt 1/4" below the lining, and then you raise it up 1/4" above the lining to stitch it down after pleating, doesn't that cause funkiness where the pleated skirt section fades into long back pleats? It seems like you'd have a wrinkle in the CB fabric from where the skirt gets raised up, but the finished version of your dress looks so smooth. Is there a trick to smoothing out the area where the skirt pleats stop and the en fourreau pleats start? Do you not overlap the skirt and bodice fabric as much at the back point? Angle the pleats? Somehow fade out that extra 1/2" of fabric in the en fourreau pleats?
ReplyDeleteThere is, and it's one I just edited with--thank you for catching it! Once I passed the curve, I tapered it so it was the same length as the lining. This was a cutting mistake, but a good one! Then at the center back, I barely folded up the bottom edge.
DeleteThe dip in the back of the lining seems to take care of the angle thing--I just pleated along there.
Any wonkiness was then covered by doing the en fourreau pleats last.
I really should've taken a picture of it flat. Now that I can do this to my satisfaction though, I'm probably going to make my upcoming redingote like this, so I can do that there. It came together surprisingly easily though--it really was like normal skirt pleating, except for the big flap of extra fabric I ignored.
I hope this clears it up!
Hi,
ReplyDeleteAfter hand stitching short gowns and petticoats, I think I'm ready to attempt a robe a l'anglaise. I'm going to do some cloth shopping in the near future and I have no idea how many yards to purchase if I find something good. I've seen everything from 4.5 yards to 6 yards. I don't mind getting extra fabric as I'm a bit of a fabric hound, but I don't want to get too little. If I'm making a matching petticoat to go underneath, I realize more will be needed- if I get 8 yards, will I be ok?
For a linen shift, ( finer than I'm used to to go under this gown) how much handkerchief linen should I get? I'm not gusty at all and fairly short. In modern sizes I'm usually a 0.
Thanks so much for any help you could offer. Since I'm following your tutorial I decided your expertise would surely put me on the right path.
Take care-
Georgia
I think I ordered 6 yards for this? I don't remember for sure!
DeleteA petticoat is about 2.5 yards (rounded up--my actual hemmed length is 38 inches), and then the dress skirt is about 2.5 yards and then the bodice about 1 yard. 45" fabric will need a little more to get the skirt full enough.
I did make a round gown out of about three yards once. I'm short and a size zero too. It was 60 inch fabric, which meant only two skirt panels.
It's been so long since I've made a shift! I think about 3 yards or so? If you measure from your shoulder to where you want the hem, that's usually a safe measurement. Linen is so wide now that you can easily get the other parts out of the leftover sides without having to worry about careful cutting.
Good luck! These dresses are really fun to watch come together :)
Busty got changed to gutsy. Sorry! Autocorrect at its finest.
ReplyDeleteYou've got to love autocorrect. One time mine suggested verbomania. I don't think that's even a word...
DeleteThis is an amazing tutorial - thank you! Directions are super clear, and for someone who likes draping and sewing, a blessing!
ReplyDeleteI've challenged myself to a Historical Sew Fortnightly to make a floral anglaise en fourreau ... Rather last minute, as I have a week to do it in... How long did it take you to finish this gown? ...and, would you mind if I linked to this post/ tutorial on my blog?
Thank you so much! And good luck!
DeleteThe part of the dress shown here took two days. I already had the lining done and was in my obsessive mode where I seem to get things done extra quickly. It's definitely doable in a short amount of time.
And please do link--I like it when people who find it helpful find it :)
Thank you so much for this tutorial! The visual is very helpful!!!
ReplyDeleteOMG, thank you SO MUCH for this tutorial!
ReplyDeleteI had been dreaming about an English Gown since forever and when I finally decided to make one, I was too scared to even start planning to cut the fabric - this until I stumbled upon your tutorial and my English Gown is now in progress. Thank you again!