Sunday, July 24, 2011

1920s Underthings!

A slight change of pace!

I recently completed a new 1920s dress for Costume College. This one is smooth over the hips, unlike the last two 20s dresses I've made, so I needed new underthings.

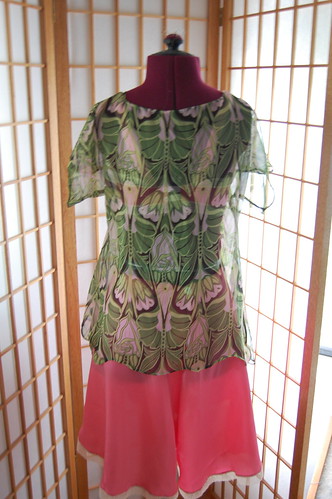
In addition, I made a dressing gown out of a wonderful pink and green nouveau-ish chiffon that I bought years back to made a 1920s kimono.

All patterns are from Women's Wear of the 1920's. I used silk crepe that I bought in the garment district in LA last year (I love Fabrics and Fabrics!) for another project, but the pink was too dark for that. I trimmed the bandeau and tap pants with lace I bought on eBay ages ago.

Dressing Gown Dressing Gown

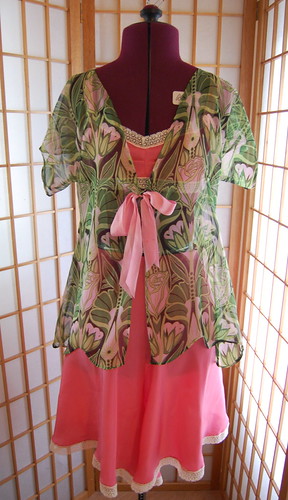
The pattern(c. 1920) is actually the same thing as an 18th century shortgown--one piece folded over and open in front. For patterning purposes though, I used my suffragette dress pattern. Using the above mentioned book as a guide, of course! The suffragette dress has the same fold over kimono sleeve thing happening, but the fit of it was closer than my shortgown patterns. Plus, I found that pattern first. Always helpful :)

I was going to trim it with pink chiffon ruffles and tie it with a green satin tie, but I liked the lightness of it so much that I decided that would be too heavy. Instead, I dyed some white ribbon I had with the remnants of an ancient bottle of Rit rose pink dye.

Everything is sewn by hand as I didn't want to use heavy machine stitches on such light fabric.

Bandeau and Tap Pants

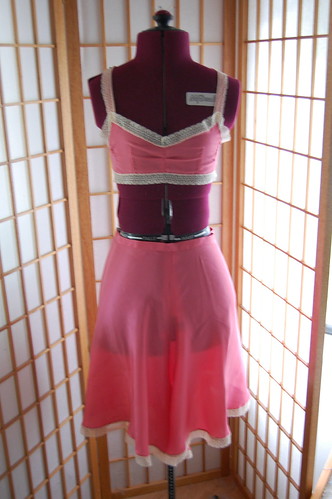
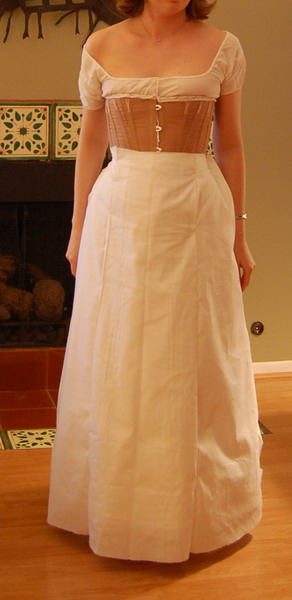
And now the bandeau (the 1929 pattern) and tap pants (1930 pattern)!

Again, it's all sewn by hand. The bandeau with back stitches and the tap pants with a combination stitch. I topstitched the darts on the bandeau as well, since the fabric pulled at the seams.

Bandeau with Very Clever Elastic

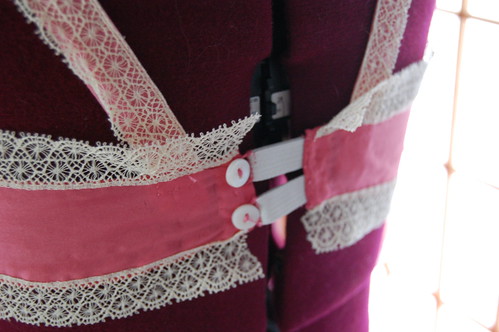
And my favorite part of the bandeau, the back! The original had 1/4" pieces of elastic doubled with loops for buttons at the ends. My elastic is 1/2", but I wasn't driving across town for a 1/4" difference. Not surprisingly, this gives the bandeau a much better fit than just fabric. I've never had any luck with something not stretchy staying down on me. Most stretchy is still iffy, for that matter :)

I reinforced the back with a bit of cotton ribbon. I also used this for the straps. I dyed it pink using the same ancient Rit dye, then covered the straps with lace so the difference in pinks wouldn't be obvious.

Garters

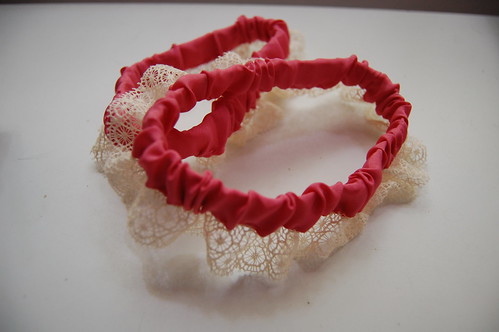
And the garters--just tubes of elastic covered with fabric and a little lace. Easy and cute :)

I will be wearing the dressing gown on Sunday morning at Costume College, so there will be pictures of it on. The fit is very different than on my dressform. I always find it very odd how those work. It's actually set below my measurements and I had to pin up the straps two inches for the bandeau to fit.

Saturday, July 23, 2011

Spotty Dress Construction, Part 4--The Skirt

From 15 March. The flounces on the back are just that, flounces. They're hemmed top and bottom and pleated to the skirt. And after much work, the completed skirt!

Coming soon, what in the world is going on with that bodice? You can't see any closures!

Squee!


And in corset news, I used artificial whalebone. Or German plastic boning. And the bloody stuff won't curve out! I've ironed it, it's been on my dressform for days, but no, the tops MUST curve in and feel stupid. Argh. I think I'm going to make the bust on my dressform as big as possible and steam the thing within an inch of its life.

But skirt! Squee!

Spotty Dress Construction, Part 3--The Skirt

Originally posted 27 February 2011

That was a lot more work than I expected it to be!

Anyway, the spotty ruffle is started. I think doubling the fabric was a good idea, and I think the ideas from my last post will work.

From the pictures, it seemed like the ruffles were just below knee length, so that's what I aimed for with mine. I hope I got it right! It looks so bare up top, but there's no overskirt which really affects things :)


Preparing the fabric. It's about double what I want it to be and the ends are folded in.


Then the long box pleating process. Notice how puffy they are? That must be dealt with!

I just eyeballed the pleats since theirs were obviously eyeballed as well.


So once I was sure they were reasonably straight, I smoothed them out.


And this was the result. I'll baste it where the pins are, and then put the other ruffle on top.

Once it's basted, I'll lightly press the pleats. I don't think they'll need any stitching in the middle, but they might need some sacque back like reinforcements. I don't think so though, and I really hope not! (ETA: They didn't! So much easier!)

27 February 2011

I was about to cut the flounces for the back of the skirt out. Typical bias cut flounces to be exact. Then I thought, better look at the picture first, especially as this skirt is a fabric hog and I can't afford any mistakes.

I'm glad I did. Except for that scary moment that I thought there were four ruffles--which wouldn't make sense as even numbers look weird--I think I like what I see. One, I think the flounces are on the straight, not the bias as is more common. If you notice, they're sort of just hanging there, not all nice and perky the way bias flounces tend to be. There's a heaviness to them. And also, look at the top flounce. It's smocked. Or something weird. I really like how it looks, but total whimper to doing it. (ETA: We ended up pleating these and found that gave the closest look). It looks like the sort of thing you want to do on the straight of grain though. Hooray for not cutting bias flounces! Of course, second opinions wished for :)


Here we have the top of the ruffle gathered and pinned into place.


A close up of that. It's seriously not attractive, but it gets covered by the little ruffle, so all is good. Gathering pleats out is weird to do.


Pressed pleats!


Now flashless. This fabric doesn't like to be photographed :)


3 March 2011


Preparing the ruffle. The fold is 2 1/2 inches long. The ironed fold is 2 inches deep. That's for the first line of gathering. Each line below is 3/4 inch lower.


Pinned into place.


The same, with flash.


The ruffle folded down.


The same, no flash.


Close up folded up. The gathering lines will be machine sewed down.

Spotty Dress Construction, Part 2--The Skirt

After much staring, it was time to start the skirt. Now, I have pictures of putting the skirt itself together. The construction method I used was mainly from an overskirt I own. For those of you familiar with 18c construction techniques, I used the sew outer fabric and one layer of the lining, then whipstitch the next layer of the lining to it method. However, I haven't written that part up, so I'm going to start with my analysis of the ruffle--mainly an explanation of why I did it the way I did. Then, actual ruffle construction in the next post.

Originally written on 25 February 2011.

As I'm fast approaching base skirt completion--2/3 a hem binding through the hem!--I'm considering skirt decoration. And here are my obsessive ramblings.


Here we have the pleated, gathered, puffed, up ruffle of doom and questionable tastefulness.

Now, look at the bottom of the ruffle. Especially on Marie's dress (left), you can see that at the bottom of the ruffle, the lines of the folds follow the lines of the folds on the large pleated part. It's not so much that way on top, but I have a theory to explain that away.

So, here's what I'm planning on doing. I'm going to take a piece of blue silk twice or so as wide as I need it to be. Then fold it like bias tape with the ends in towards the center. Then pleat and baste it in place. I'll start it where I want it to stop then just pleat around--no measuring!

This will be fine for the bottom--it just has to hang. But the top will flop. So, run a gathering line through it and baste it there. Sewing the pleats down would be too pleaty, which isn't an issue if they're hanging, so, a gathering line.

Next, the ruche-y bits. This is the same as the Halloween dress. Take strips the same length as the pleats and gather them as needed. Leave the top edge raw and fold the outer edge down so the edge is caught in the last row of gathers--essentially a deep hem.

Then, place it right side to right side on top of the pleats, sew it down. Flip it up, machine sew through the lines of gathering stitches, and voila! Pleats and gathers and prettiness! Oh, and questionable taste :)

The doubled silk will be very good as it is a thinnish taffeta. It's really a super pretty one though. I'm surprised how nice it looks in use.

After that, standard bias ruffles on the back. (ETA: After much staring, we later decided these ruffles were on the straight of grain. Very lucky, as we both nearly ran out of fabric) Why after that? It's easier to play with the height of those than it is to play with the height of the doom-y ruffle :)

Also, I just noticed that Marie's doom-y ruffle is taller than Alexandra's. Neat!

Spotty Dress Construction, Part 1--The Skirt

Well, hasn't it been ages since I've posted? Let's, uh, blame Costume College! Anyway, ages ago, I promised spotty dress construction, so I thought, might as well begin, especially as I have several posts already written. Therefore, I am slightly cheating :)

So here's a repost of a post originally made on 8 February 2011 on my Live Journal and was just for a small number of people who provided that much needed encouragement and advice. As a masquerade costume, it needed to be kept rather secret!

So here we go, patterning the spotty skirt!

I actually made a skirt muslin! I'm sure this is amusing to no one but me, but it's very much out of character.

Now, my muslins aren't other people's muslins. They require imagination. But I think I like the skirt shape I came up with.

I didn't sew it (let's not get crazy here). It's just pinned.

I used the pattern for the Halloween dress skirt--the 1874-1877 skirt on page 32 of Janet Arnold. I noticed that the Halloween dress had a similar straight shape in front. The back wasn't quite right, but easy enough.


I ended up taking an inch of flare out of the bottom of the center piece and side piece. Repinning a skirt while wearing it isn't fun! I jammed my left middle finger with a pin quite nicely...

It doesn't look as straight as their skirts do, however, once it's in silk lined with cotton and trimmed, I think it will be. The Halloween skirt is much straighter.

The side picture below also makes the skirt look a little wider than this picture does. It seems a little more natural there, so I think it looks a little narrower here do to intense train fluffing.

Also, ignore the too short thing. It had to clear the floor for the fitting! And again, ignore the badly pinned side pleats. They're enough to get the idea!


To change the back, I used a full width of muslin and didn't pouf it up. I think it'd be helped by using a full width of silk--I think it's still a little narrow--but I'm lazy when it comes to muslins and, well, imagination! Having someone to fluff the skirt out and all the flounces to stiffen it will help too.

Also, I didn't bother with the back yoke--these dresses don't need a flat spot there, so no yoke nonsense.

The skirt is very badly pinned to some other thing that's around my waist. Probably the petticoat. I just hope I don't rip anything taking them out :)

Anyway, to get the train to flop over the front, I concentrated the fullness more towards the side back piece than the center back. That took a bit of futzing to come up with. Also, the skirt does "tie" in back. Why the quotes? I have some badly pinned in pieces of muslin imitating the ties.

The back is also just large pleats. Gathering will give it a softer look, more like the original.

I'm wearing it over my new bustle and corset and my old bustle petticoat. The corset looks way prettier when you can see the whole thing. I have nice waist definition, but I always think just the top part of my looks way off balance in a corset because I have to make them so short since I have zero chest. Trust me, it's a super pretty little corset :)

Tuesday, July 12, 2011

18th Century Shopping!

Do you want 18th century clothes, but for whatever reason don't want to make them? My friend, Sarah, who is a very amazing seamstress, just opened an Etsy shop-- The Rampant Lion.

Right now she has shortgowns and a children's gown listed. She also does custom work--just because it's not on Etsy, doesn't mean she doesn't do it.

Just to prove she's awesome, and I'm not just saying that, here are a few pictures of her work:

sarah_bedgown

In working clothes.

Costume College 2010

A step up the social ladder, with me a decade or so later :)

sarah_gala02

And way later, but too awesome a dress not to share--those pleats!

So, if you're in the market for custom historic clothes, be sure to check her out!

Sunday, July 10, 2011

Parisian Pet-en-l'air!

I just realized that I haven't posted pictures of the Parisian pet-en-l'air I wore on Friday of Under the Redcoat!

First, with the knitted pinball, of course :)

The Parisian Pet-en-l'air!

Parisian Pet-en-l'air Parisian Pet-en-l'air

I'd like to get a few more detail shots eventually. The cuffs have a round of pleated trim and then are shaped at the bottom with a covered button and a cord.

And a few before trim pictures.

Parisian Pet-en-l'air

Parisian Pet-en-l'air Parisian Pet-en-l'air

I used this pet-en-l'air from the Manchester Galleries as my inspiration. The fabric was bought in Paris in 2004. It's made over a fitted lining, using essentially the same techniques as the chocolate francaise. This doesn't have robings though, so I lined up the front edge to the lining and hemmed it.

I'm wearing it over a shift, 1770s stays, stockings, two linen under petticoats and my Burnley and Trowbridge shoes with William Booth Draper buckles. I had left my handkerchief at home, but fortunately had a length of silk gauze (that I wore in my hair with the Marie Antionette dress), which actually stayed better than the triangle pieces.

I did take pictures of making my black silk hat, though I claim no knowledge of how they made bonnets like this in the 18th century. The techniques I used are from 19th century bonnet patterns I've used. There will be a tutorial eventually :)

I didn't have the trim go all around the skirt--it's a slightly heavy cotton and I was worried it would disrupt the line of the pleats. The stomacher pins shut and the bows tie over it. This is different than the pet-en-l'air I copied; however, I wanted the bows to be more decorative and not have any gapping because the bows were sewn underneath. This happened with my Jacobean jacket, and I liked the effect there, but I didn't like the idea of it for this dress.