In 2010, I wrote an article on setting sleeves for
Your Wardrobe Unlock'd. Since I hope it's a rather useful article, and enough time has passed for me to publish it, here it is!

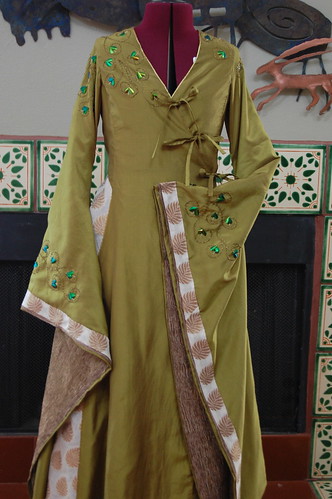
The finished dress--and the dress that inspired it!
When looking at a pattern for a sleeve on an 18th century dress, there’s a rather striking difference when compared to modern sleeves—they have corners. This is because for much of the 18th century sleeves were set differently than they are today. Instead of finishing the bodice and armscye, turning them inside out and inserting the sleeve, the sleeve was set in the lower half of the armscye, the dress was put on, and the sleeve head was pleated to fit the wearer. This is a very efficient method and prevents a lot of the stress often associated with setting sleeves, yet for a seamstress sewing for and by herself, it presents a problem. How exactly do you pleat a sleeve on yourself?
Many books on costume construction include details on how sleeves were set. There are slight variations, but in general, the technique remains the same.
The setting method I describe and used on my printed cotton polonaise will produce a sleeve that looks identical to the pink/lavender 1770-1785 gown on pages 24-28 of Costume Close-Up. The method is slightly different as the lining was sewn last in that dress, and the lining is sewn first in my example, yet the finished product will look the same.
The Costume Close-Up dress has a shoulder strap that is sewn to the dress at both front and back instead of being cut as one with the front of the bodice. The shoulder strap lining is covered with a strip of silk that matches the shape of the linen lining. This strap covers the raw edge of the sleeve. Many dresses had no such fashion fabric straps. Robings were often used to cover the raw edge of the sleeve. If your dress has robings, there is no need to make the separate strap. The raw edge was also sometimes covered with trim.
These instructions assume you’re starting with a fitted bodice and sleeve pattern. This technique, however, allows a lot of wiggle room when it comes to setting the sleeve!

First, complete the bodice except for the shoulder straps. Complete the sleeves as well.


Next, prepare your shoulder strap linings. Press the front, back, and armscye edges of the seam allowances under. Pin the shoulder strap to the lining, as shown. The folded edge of the strap should be about half an inch—or your seam allowance—in from the armscye edge.


Once your strap is pinned, the next step is of course to sew it in place. It is important to sew this to just the lining—that way you don’t have to worry about covering any stray stitches that show through your fashion fabric, and more importantly, be able to turn in the neckline edge to finish it. To imitate the look of the original, I used whipstitches. Backstitches, or even machine stitches, would work as well.


Next, set the bottom half of the sleeve. Pin the sleeve right side to right side, as you would for a standard sleeve. The corner at the back of the sleeve should line up with the back armscye where it extends past the shoulder strap. This spot is marked with an X in the photo.


Sew this underarm seam with a backstitch. Start at the corner where the strap meets the bodice, sew through all layers, and stop at the corner on the opposite side. In the photos, you can see my first and last stitch being made.

Now, turn the sleeve and bodice right side out. Since the last half inch or so of the back of the sleeve isn’t sewn, it should slip easily into place. The front of the sleeve will have to be eased a bit.


Pin the top half of the sleeve to the shoulder strap. This is the fiddly part. Don’t be afraid to adjust it several times. Play with the pleats and the depth of the sleeve seam allowance until you like how the sleeve looks.


Try the sleeve on to be sure you’re happy with it. One benefit of setting a sleeve this way is the pins are all on the outside, which makes this step rather safer than normal. Don’t expect the sleeve to be completely smooth. There will be a few wrinkles! This is normal, and even necessary. Folds in the sleeve allow you to move your arms. If you look through portraits, these folds are often evident. They can also be seen on extant garment that have been mounted on mannequins.
Please note that in the pictures I’m not wearing my stays and the bodice isn’t pinned shut—I’ve used this pattern before and am comfortable enough with the fit to do this.


Once you’re satisfied with the fit, pin the inside of the sleeve. Make sure the seam allowance is turned under, and whipstitch the folded edge to the sleeve. It’s not important to sew through all layers, as you’ll do that when you sew the shoulder strap or robing on. I like to leave the pins on the outside to keep the pleats in place until I sew the fashion fabric strap on.

Next step, you need to prepare the strap. Fold the seam allowances under like you did for the lining strap.

Then pin the fashion fabric strap over the raw edge of the sleeve. The edge of the strap should extend slightly past the lining strap. This allows you to easily sew through all the layers and avoid any stitches from the lining showing through.


To sew the strap to the sleeve, I used a spaced backstitch. The short ends of the straps should be sewn to just the fashion fabric. This allows you to turn the fashion fabric and lining in towards each other to finish the neck edge. Over the shoulder itself, be sure to sew through all layers.


Now, finish your dress!
Setting a sleeve this way gives the distinctive look that the back of 18th century dresses have. Setting a sleeve the standard way gives too round a shape and doesn’t allow the sleeve to fit correctly over the shoulder. The ease of this method—since you can adjust the top of the sleeve so easily—also makes the sewing process a little more enjoyable.