
I think half the reason I wanted to make a Melisandre cosplay was to make her necklace. Once my friend Loren of the Costumer's Closet--who's done a lot of interesting work with props--suggested that the necklace light up, I knew I had to make it work. I found a few other necklaces online that lit up, but none of the ideas quite worked for my necklace, so I had to come up with my own way of doing it. This is an entirely new area for me! I know nothing about electronics--especially making them so small!
And about the post title--clearly, my subconscious was at work. I didn't really mean to make the reference, but since I do know nothing about this, it was a logical title, which obviously needed to be kept. More details about my trials and false starts at the bottom of this post.
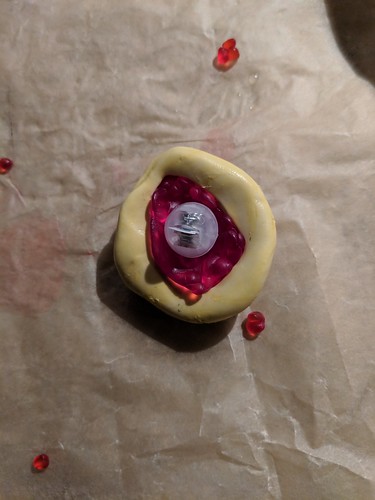
For the stone, I used Worbla's Crystal Art dyed with Rit DyeMore in racing red with a little charcoal mixed in. I made a model of the stone with paper clay. I used Amazing Mold Putty to make the mold. It's lit up with an Accmor LED Mini Round Ball Balloon Light that's held in with red electrical tape.

For the necklace itself, I highly recommend the 3D printed kit by TatianartCosplay on Etsy. It's fantastic. It comes with everything you need (except pliers and glue), and has clear instructions. The stone took all of the stress out making my own--it didn't matter if mine didn't work. Backups are excellent things to have! I ordered a few extra links because I was also planning on wearing the necklace with my 1930s Melisandre dress, so wanted the necklace to go around my whole neck.
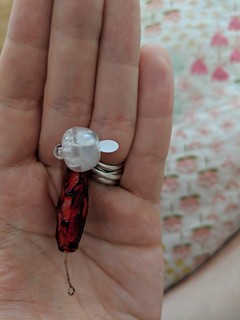


About the bulbs--researching making small things light up, the smallest thing I found was an LED bulb taped to a coin battery. A coin battery was bigger than my stone needed to be, so I decided to try two smaller button batteries with an LED bulb. This worked, but the two batteries were somewhat precarious, and the setup was still bigger than I needed. Targeted advertising to the rescue! I got an Amazon ad for bulbs meant for balloons and lanterns, and decided they were worth a try. They ended up being perfect. They were bigger than the model stone, but not too big for the link--all I would need to do would be to make a deeper stone. They come 100 to a bag, so I now have enough to light up an army of red priestesses...

I made the stone shape out of paper clay. This was surprisingly easy--I have no talent in this area, but the clay was easy to work with, and I just played with it until it made the shape of a stone. I made several because my first attempt shrunk and ended up being too small for the light bulb.


I split one of the light bulbs open and marked the back of the stones with it to measure how much they were shrinking. After a few hours, I picked the stone I thought was best and scooped the inside of the clay out. Then I left it to fully dry. The picture on the left with the mark from the bulb is actually the first attempt that shrunk. When I measured the bulb against it, the original line was just inside the bulb. The picture on the right shows the hollowed out stone that I ended up using with the bulb in it, showing that it still fit.
The yellow that's surrounding the stones is the Amazing Mold Putty. It's very easy to use--mix equal parts of both putties in the kit, and shove the stone in it. I used a kitchen scale to measure the putty. Once it's dry, the stones came out easily.
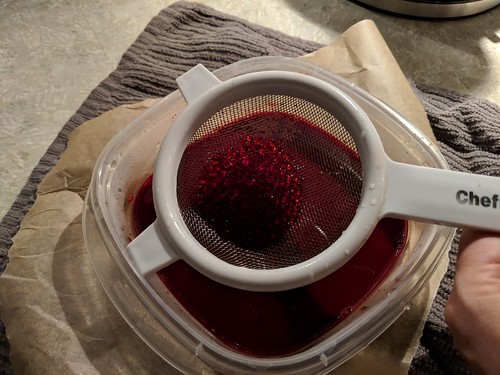
The next step was to dye the Worbla. I put it in a strainer, put some red dye and a little black dye in the container, and mixed it with boiling water. I didn't measure anything, just hoped for the best. This is also where I learned that my heat proof gloves were not also waterproof.
I don't have pictures of the next few steps, but they're fairly straightforward. I put the Worbla on a baking sheet and used a heat gun to melt it. Then I pressed it into the mold, making sure to press it around the edges and make it hollow. When it was still in the mold, I put a light bulb in and pressed the Worbla around it a little too. As it started to cool, leaving the bulb in, I took it out, and continued to shape it. The final shape had almost nothing to do with the shape of the mold, but it didn't matter--it worked and I liked it. I used a needle to poke holes in the top and bottom of the stone, and put lightweight eye pins through the holes.
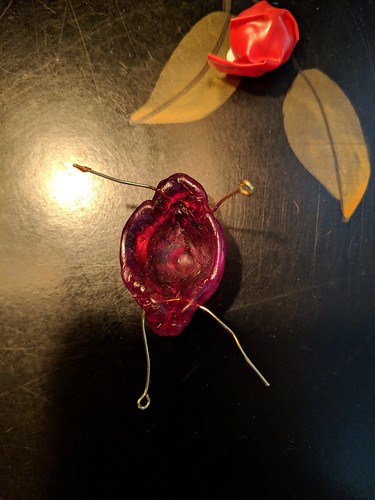

Here's the finished stone, without the light bulb. You can easily see where I molded it around the bulb. I should've done it backwards, since the bulb itself made a little round impression that you can see when it's lit. I smoothed it out a bit, and it's not really noticeable, thankfully!


The light bulb is just wedged in with electrical tape. This may be slightly just thrown together, but it works really well. Having something more permanent would require a larger set up. The light bulbs are extremely bright, and I found they looked best if you put the bulb itself pointing towards your neck.

I twisted the eye pins together to make a stem at the top and bottom. The center link in the kit has indentations to hold the stone. Just add a little glue, and it holds securely. The links have been spray painted gold as a base.


I'm not going to say too much here--I just followed the instructions with the kit--but here are the links gilded and antiqued.
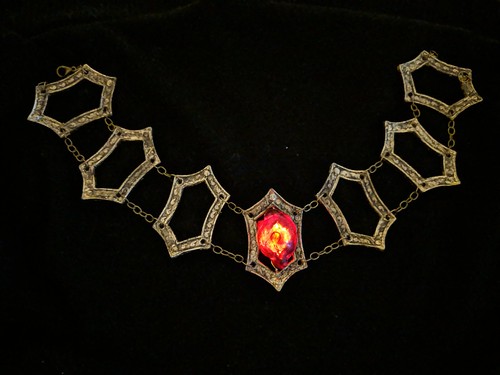

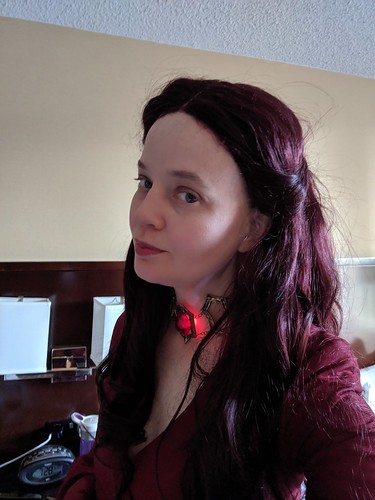
The completed necklace! The links are held together with jump rings and chains, which, while different than the original, is much easier to do, and makes an easy to wear necklace.
And now for a little about what didn't work. Here's the first try of the light--you can see how large it ended up being--too large to work with a stone. It also didn't want to hold together easily. Since I'd be inserting it each time I wore the necklace, this wasn't ideal.

The first attempt of the stone. It's too small because the paper clay shrunk a little, and I suspect I didn't make it deep enough. I also didn't melt the Worbla enough, so the original shape remained visible. Also, the red was clearly too light on its own--mixing in a little black made a huge difference!
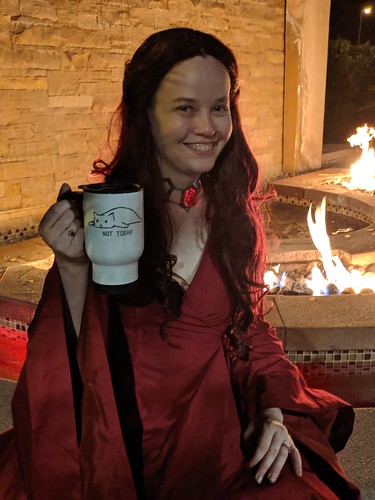
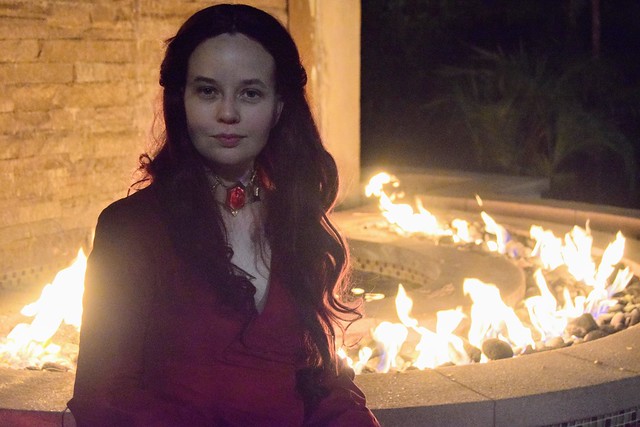
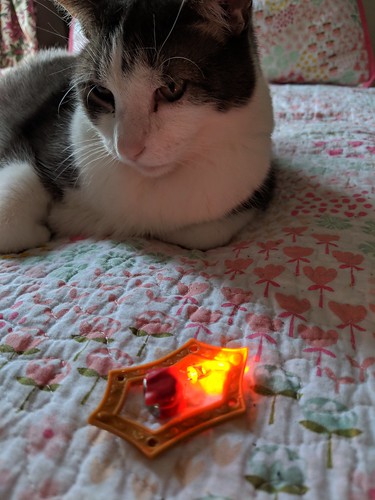
And what do we say to the god of death? I've wanted to take this picture since the Battle of Winterfell--I do think this shows the glow nicely!