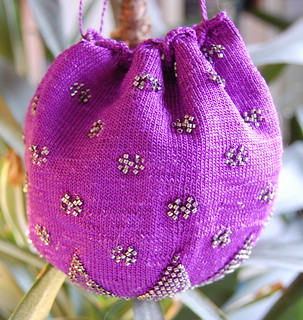
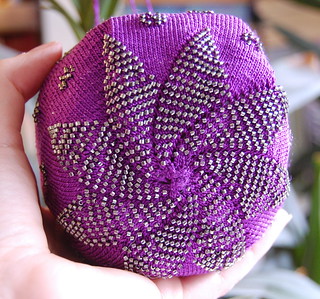
Knitted and crocheted bags with star motifs at their bottoms were popular during the Victorian era. And why not? Not only are these stars attractive, but they’re one of those deceptively simple things to knit. Once you get past the probably most awkward knitting ever—casting on eight stitches over four double pointed needles—it’s incredibly logical and the design progresses quickly. Don’t be intimidated by the 5/0 needles. They’re remarkably quick to adjust to. They’re quite the conversation piece as well—who doesn’t occasionally like impressing others with knitting?
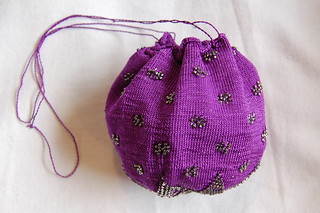
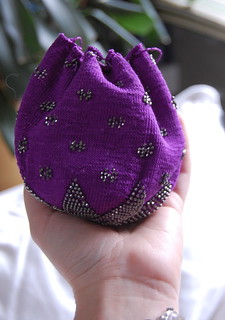
Adjustments to original: Mrs. Gaugain’s original pattern was remarkably clear. The only adjustment I’ve made to it is to add a row of eyelets near the top to thread a drawstring though. She makes no mention of how the bag should be finished. Contemporary bags in museums often have a row of eyelets, so I decided to include them. My bag—like many originals—is lined. I used a tube of silk taffeta, gathered at the bottom and whipstiched into place just below the eyelets.

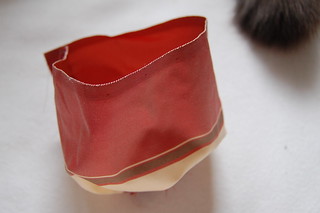
Here's a link to my Ravelry project page.
And here's a link to the pattern page on Ravelry.
The pattern is below the cut!
And a PDF of the pattern! I downloaded an app for my phone--I'm surprised I didn't think of that first!
Materials
Yarn: Purely Silks silk beading cord size F, one 140 yard spool and one 20 yard card
Needles: One set of five double pointed needles size 5/0
Beads: 1592 seed beads, size 11/0
Gauge: 19 stitches and 24 rows to an inch
Substitutions: As this is a bag, gauge, needle size and yarn aren’t truly important. Any needle and yarn that knits into a relatively firm fabric will work nicely. It doesn’t have to be a tiny Victorian bag!
While I made the bag out of one spool of cord, I had just enough and would have liked a little more for the drawstrings.
A note—If you wash your bag, the hand changes dramatically. Before washing, my bag was very stiff and dense. After washing, it was quite soft and fluid.
Where to buy: The beading cord and beads are both available from Fire Mountain Gems. Small needles are available from Lacis and Bugknits.
The Pattern
This pattern is much less complicated than it appears. Each row of the star is slightly different, which makes for a long pattern. I’ve included a chart of the design as well.
Symbols:
Knit—K
Yarn Over—YO
Place Bead—B
Knit two together—K2tog
Thread the beads on the cord.
Cast on 8 stitches on one DPN.
Alternately, you may cast two stitches on each of four needles and join round one, as the original states. However, I find it easier to cast on one needle and the bottom of the bag closes just fine when you join row two instead.
Row 1: Knit each stitch, knitting two stitches on each of the four remaining needles so that each needle has two stitches on it—8 stitches total.
Row 2: Work this row in the round. Knit 1, increase one by knitting into the front and back of the next stitch, repeat—12 stitches total
Row 3: Knit—12 stitches total
Row 4: Knit 2, increase one by knitting into the front and back of the next stitch, repeat—16 stitches total
Row 5: Knit—16 stitches total
If using the chart, start chart one here.
Row 1 of star pattern: YO, K1, B, repeat (there will be two repeats on each needle)—24 stitches total
Row 2 and all even rows: K
Row 3: (YO, K1, B2) repeat—32 stitches total
Row 5: (YO, K1 B3) repeat—40 stitches total
Row 7: (YO, K1, B4) repeat—48 stitches total
Row 9: (YO, K1, B5) repeat—56 stitches total
Row 11: (YO, K1, B6) repeat—64 stitches total
Row 13: (YO, K1, B7) repeat—72 stitches total
Row 15: (YO, K1, B8) repeat—80 stitches total
Row 17: (YO, K1, B9) repeat—88 stitches total
Row 19: (YO, K1, B10) repeat—96 stitches total
Row 21: (YO, K1, B11) repeat—104 stitches total
Row 23: (YO, K3, B10) repeat—112 stitches total
Row 25: (YO, K5, B9) repeat—120 stitches total
Row 27: (YO, K7, B8) repeat—128 stitches total
Row 29: (YO, K9, B7) repeat—136 stitches total
Row 31: (YO, K11, B6) repeat—144 stitches total
Row 33: (YO, K13, B5) repeat—152 stitches total
Row 35: (YO, K15, B4) repeat—160 stitches total
Row 37: (YO, K17, B3) repeat—168 stitches total
Row 39: (YO, K19, B2) repeat—176 stitches total
Row 41: (YO, K21, B1) repeat—184 stitches total
Row 42: K
You now have 46 stitches on each needle for a total of 184 stitches.
Begin pattern two, the spots. The first row of spots is centered between the points of the star. The second row of spots is centered over the points.
Repeat the spot pattern three times for a total of six rows of spots.
Row 1: K10 (B, K, B, K20) repeat to last ten stitches, K10
Row 2: K9 (B2, K, B2, K18) repeat to last nine stitches, K 9
Row 3: K11 (K, K22) repeat to last 11 stitches, K11
Row 4: K9 (B2, K, B2, K18) repeat to last nine stitches, K 9
Row 5: K10 (B, K, B, K20) repeat to last ten stitches, K10
Rows 6-14: K
Row 15: K1, B (K20, B, K1, B) repeat to last 21 stitches, K20, B
Row 16: K1, B2 (K18, B2, K1, B2) repeat to last 20 stitches, K18, B2
Row 17: (B1, K22) repeat
Row 18: K1, B2 (K18, B2, K1, B2) repeat to last 20 stitches K18, B2
Row 19: K1, B (K20, B, K1, B) repeat to last 21 stitches, K20, B
Rows 20-29: K
On the third repeat, make eyelets on row 25 as follows:
K7, K2tog, YO, YO, K2tog, K8, K2tog, YO, YO, K2tog, repeat
Bind off!
To make a drawstring, take a few lengths of your knitting cord, a little over double the length you want your drawstrings. Tie or pin the ends to something stable—I use the pull on a coffee table drawer or pin them to the couch. Treating them as one, twist them together until you can’t twist any more, pulling them to keep a firm tension as you do it. Fold the twisted thread in half, and it will twist on itself into a cord. Be sure that the twists in the cord is facing the same direction, and twist in that direction.
You’ll want to make two drawstrings. Thread one from right to left with both ends coming out on the same side, and thread the others opposite—from left to right. This creates a bag that cinches up easily.
My drawstring is made of just one twisted length as I ran out of cord.
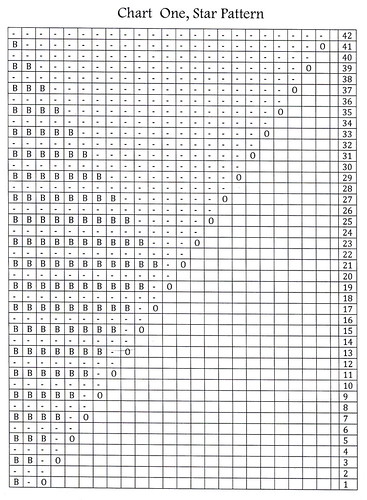
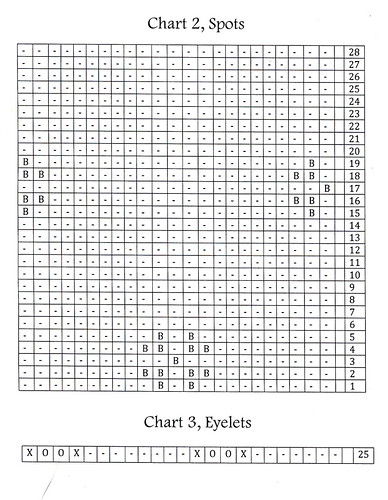
Key: K - Yarn Over YO Bead B Knit two together X

It so beautiful!
ReplyDeleteI've awarded you an Inspiring Blogger Award (http://olympesdiary.blogspot.com/2013/05/inspiring-blogger-award.html). Thank you for the always interesting posts!
ReplyDeleteThis is beautiful. Thank you for the updated pattern and charts.
ReplyDelete