Showing posts with label tutorial. Show all posts

Thursday, August 2, 2018

Making A Game of Thrones King's Landing/Handmaiden Dress

GoT Handmaiden 1 GoT Handmaiden 2 GoT Handmaiden 3

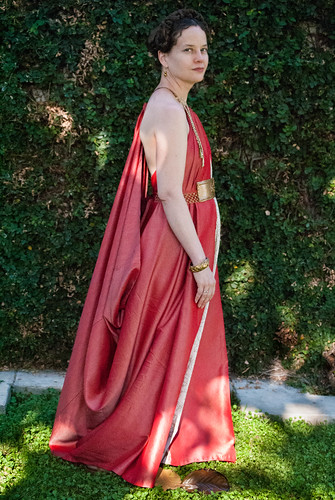
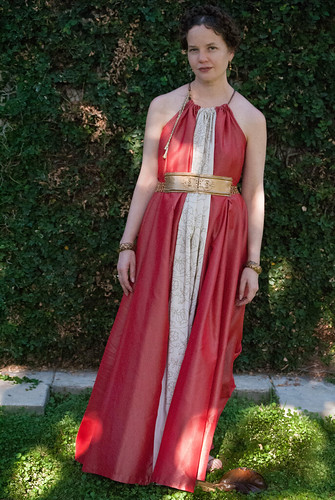
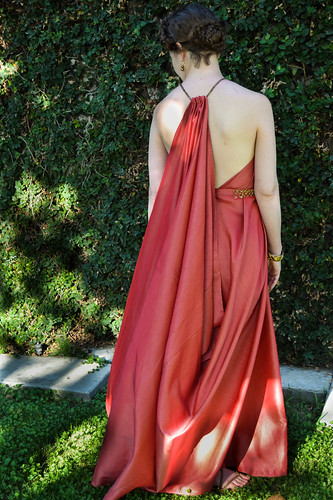
Since first seeing them, I loved the gowns that Cersei's handmaidens, women in King's Landing, and later Shae wore. Looking at them, I realized that they were really quite simple--a giant tube with drawstrings at center front and back and belted at the waist. Mine is made from about five yards of silk taffeta from Renaissance Fabrics which I washed to change the drape of. My belt is made of Worbla based on this tutorial by Jak Cosplay. I learned the hard way that you should read the description carefully on your chainmail rings and make sure they're not for jewelry.

After figuring out my dress, I did a search to see how others had done them. I found a sketch that someone who had come to the same conclusion had done, but haven't been able to find it again. I also found a post on the Game of Thrones Costuming Facebook group with a similar technique.

More pictures of the dress can be found here

Being me, I hand embroidered the front panel, used fingerloop braiding for the ties (using the videos seen here. I used 5 loop flat for the drawstring and 5 loop square for the tie. I finished the ends with gold rings from Fire Mountain Gems by sewing them to the ends and wrapping the join with thread), and hand sewed the seams. However, this can be a very quick project! You can see some progress pictures using the hashtag got_handmaiden_k on Instagram.

But onto the dress! First, a video of putting it on. I also have pictures at the bottom of the post, but the video shows it more clearly. And obviously I don't wear a camisole or underskirt when I'm wearing it, but it was necessary to do something for pictures!


Saturday, August 8, 2015

A Mantua Maker's Seam--A Tiny Tutorial

Have you ever looked at a sheer early 19th century dress and wondered how they could possibly make skirt seams so small? A mantua makers seam recreates that look with much less effort than a French or flat felled seam.

The mantua maker's seam is described in The Lady's Guide to Plain Sewing, Book II from Kannik's Korner, which is a wonderful book--along with Book I--for anyone interested in period stitches.

DSC_0451

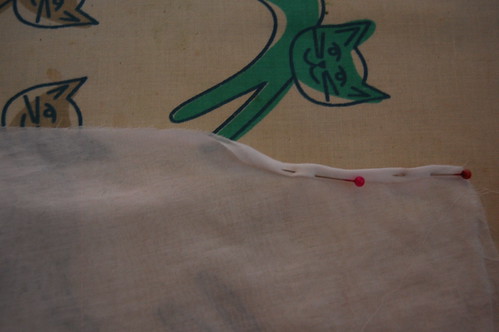
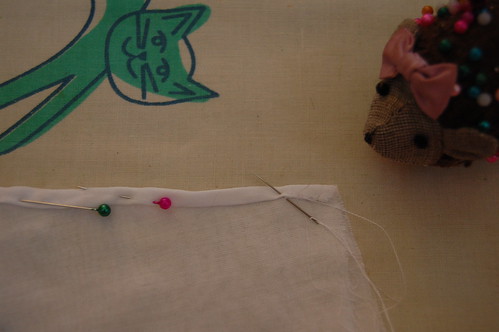
Cut your skirt as normal. Put your pieces right sides together, as usual. Offset the under edge slightly, especially if you're using a thicker fabric. (I actually didn't do this since my cotton voile was so light.) Then, treating the two as one roll them as if you were going to hem it. Pin the whole seam like this.

DSC_0452

Then, just as if you were hemming, whipstitch the seam. Your stitches should be small and fairly close together. And that's it!

The sample here is the skirt on my Lost Hope dress.

Tuesday, August 20, 2013

An 1840s Wrapper--A tutorial

A few years ago, I got a copy of Garibaldis, Engageantes & Cages: American Fashions of the Civil War Era, 1840-1870 from the Shippensburg University Fashion Archives (which is very sadly out of print), and ever since, I've wanted to make the absolutely adorable 1840s wrapper in it. After Costume College this year I was suddenly in need of a wrapper, and I had the absolutely perfect pink and green floral striped cotton for it. I documented each step, as it is a rather unusual thing, and here I present a tutorial!

Untitled

As usual, I started with my 1860s base pattern. The wrapper has a one piece fitted back, two front pieces gathered at the shoulder and loose at the waist, two belt pieces that lace shut over the front pieces, long tight sleeves, and a separate skirt, cartridge pleated in back and flat to the bodice in front. The side seam is left open from underarm to waist. This open seam is covered by the belt.

I've followed the notes with the pattern as closely as possible with a few variations. The original has a hook and eye at the neckline. I closed it with a pin and brooch. I made the sleeves fit so they didn't need a hook and eye, I added a pocket (cell phones you know, mine doesn't fit in my knitted pineapple!), and used eyelets instead of thread covered metal loops for lacing. I also hemmed instead of faced it. Hemming was still done, and it saved time. As I wanted to make two of these in six days, it seemed a reasonable compromise!

Anyway, onto construction!

Wrapper Construction

Here are the pattern pieces laid out. The back is lined, the belt pieces are lined, and the front pieces are left unlined.

Friday, March 8, 2013

18th Century Short Cloak--A Tutorial!

As I was browsing 18th century cloaks online, I came across a great page at The Hive Online about short cloaks. The page, as 17 April 2016, is now a gardening site.

DSC_4898

My finished cloak!

Making the cloak is very, very easy. Mine took about an hour and a twenty minutes, and had I been happy with the ties, would've taken an hour and two minutes. Yes, I did time it :)

For information on patterning, do visit the above website. I did a pattern in muslin first, not so much because you need to, but because wool is $20 a yard, and I didn't want to make a mistake. I bought 1 1/4 yards.

Short Cloak

Here we have the pattern pieces--one cloak, two collars. The cloak body is essentially a stretched half circle. Please note that I'm the "very short and skinny" person mentioned in the article and I didn't have to piece it. I did though shorten it one inch on each side from my pattern. I wasn't about to piece one inch by about 4 inch pieces. It was much easier to make it slightly less full. I don't think such a small piece would even hang correctly in such a thick fabric. I have seen originals with much smaller pieces pieced, but losing a part of a sleeve is much different than a cloak!

Short Cloak

Gather the neckline and pin the collar into place, right side of the cloak to wrong side of the collar (not that it really matters with many wools!), with the collar pointing down. Sew with a backstitch.

Short Cloak

Pin the second half of the collar into place, wrong side of the cloak to wrong side of the collar, with the collar pointing up. Sew into place with a whipstitch. (I used backstitch. In typical me fashion, I read the article, read Costume Close-Up, and then did my own thing stitch wise because I forgot what I read and didn't recheck the stitch until I was done.) This will fold over, and the gathered neckline of the cloak will be sandwiched between the two layers of collar.

Short Cloak

Sew the ties in (I used black wool twill tape), and you have a cloak! So easy, and it really was nice and warm to wear. Of course, it was about 40 degrees when I wore it, which I normally don't consider warm enough for outer wear, even in the real world, but it was still much warmer with it on than with it off :)


Tuesday, January 15, 2013

Another Muff Cover--A Mini Tutorial!

I have a muff base, so of course, I needed more than one muff cover! Some of my favorite period muffs are those with miniatures. I didn't think I'd be able to have one though, as I don't draw, paint, or anything remotely like that.

Enter Spoonflower and public domain artwork :)

Pink Muff 5

It was really quite simple--I found a painting I liked, in this case, The Wool Winder by Greuze, cropped it into an oval in Photoshop Elements, and uploaded it to Spoonflower. I chose a centered design, and just hit the smaller button until I liked the measurements--about 3 1/4 by 2 1/2 inches. Then, all that was left was to order a cotton/silk blend swatch. An 8x8 swatch is more than enough fabric--note the size of the design--and only $5.

Pink Muff 1

And here's the swatch. The cotton silk is a nice, satiny fabric.

Pink Muff 2

I cut the "miniature" out and clipped the edges so they could be tucked under.

Pink Muff 3 Pink Muff 4

Then pinned it on, and sewed into place with a whipstitch. Unlike my last muff, I sewed the trim on first this time.

I then made a frame and bow of some sequins I had on hand (yes, modern, but I had them on hand, and they are flat, not cupped. They should be round, but I was impatient and didn't want to spend a fortune on real metal spangles for this project).

I then finished the cover as in my last muff. I did make this one two inches shorter though, so it fits better. Important with no trim on the ends!

And now, of course, I need another. I uploaded a mezzotint to Spoonflower today during lunch at work. I didn't even crop it this time (silly impatient me) and will just cut it into an oval when it gets here. This will be a grey silk satin muff with a pearl frame and a green embroidered vine around that.

Muff Number Three!

I think I might be addicted to muff covers. They're quick and so pretty!

Tuesday, January 8, 2013

An 18th Century Muff Cover--A Tutorial!

Part One of this tutorial describes how to make a muff base

muff_cover01

First, measure the circumference of your muff. This will be measurement one for your cover. Mine measured 20 inches.

muff_cover02

Next, measure the length of your muff, plus a little extra for overhang. My desired measurement was 15 inches, though next time I'll make it a little shorter.

muff_cover03

Cut a piece of fabric that measures measurement one--with no seam allowance--by measurement two--with a one inch seam allowance on each side. My fabric therefore measured 20x17 inches. You don't want a seam allowance on the circumference so it's nice and tight. You want a larger than usual seam allowance on the length so you can make channels for the ribbon.

muff_cover04

Iron the length ends under 1/2 inch, then turn and iron them 1/2 inch again. This will make sewing your channels much easier!

muff_cover05

Unfold the seam allowances, fold the muff cover in half, and pin the top edge shut. Stop the pins about 1/2 inch from the fold for the channels. These are the vertical pins in the above picture. You're just going to sew between those two pins so the ribbon has room to escape. I used a small backstitch for that seam.

muff_cover06

Once you've sewn the seam, refold the channels at the edges into place, and sew. I used a small whipstitch for this, and went over the opening twice.

muff_cover07 muff_cover08

Thread the ribbon through the channels.

muff_cover09

Stuff the muff into the cover, and tie the ribbons. Make sure you can still fit your hands in :)

muff_cover10

And decorate! You can decorate before sewing as well, of course, but my trim was so thick I didn't want it in the seam. I also wanted to play with placement.

And now I'm really looking forward to a second cover :)

An 18th Century Muff Base--A Tutorial

While visiting the Milliner's Shop in Williamsburg, I saw something rather brilliant--a muff base with removable covers. How wonderful is that? Only one largish thing to store, with lots of little fun covers? Well, with an upcoming trip to Williamsburg in March (please, don't be unseasonably warm), I decided that it was about time to make one. Which, of course, means a tutorial!

Though linen would probably be a more typical base, I used some wonderfully soft pink wool leftover from my pink and green wool Regency dress. I came across it when looking for linen and decided to use it. I used polyester fiberfill to stuff the muff. Yes, wool would be the accurate choice, but I didn't want to use up the last of my wool batting, and for this purpose, the synthetic does work. And sometimes being able to go out and buy something is just nice!

OK, so, onto the muff!

muff01

I started with a rectangle of fabric 21x26 inches. (Well, I started with two that size and then realized that the muff would be too big. Way too big. I liked the folded in half size!) I folded that in half to make a 21x13 inch rectangle and sewed the long seam shut using a small running stitch.

You can make the muff whatever size you want--look at fashion plates and originals for ideas. I say that a lot, don't I? But I only say it because it's true!

muff02

Next, I folded the muff in half, creating a tube. The bottom end of the muff is a fold, and you stuff the top end. You're basically starting to turn it right side out, and stopping half way.

muff03

This picture shows the tube a little more clearly. Stuff the tube! Use lots of stuffing. You want the muff to be nice and firm.

muff04

My stuffing came with a Stuffing Stix! Use it! It really helped. If you don't have one, it's really just a blunt chopstick :)

muff05

Once the muff is full, pin it shut. Continue adding stuffing around the top as you go.

muff06 muff07

Once you have it pinned, turn the edges in to each other. Trust me--it's much easier to do this in two steps instead of turning the edges in right away!

muff08

Whipstitch the top edge shut. And that's it! You're ready to make lots and lots of pretty muff covers!

muff_cover01

Part two shows how to make a muff cover!

You can see my friend Aubry's muff here
And a description at A Fashionable Frolick

Tuesday, January 1, 2013

A Sacque--Or Robe a la Francaise--Tutorial, Part Nine--Separate Front Skirts

Since the rest of this tutorial tells how to make a sacque with the skirt and front bodice cut in one, but many sacques--especially later ones--were cut with separate skirts, I thought I'd go ahead and update this tutorial!


I'm mainly basing this off the robe a la francaise in Patterns of Fashion 1.

This tutorial picks up after Part Three, The Back of the last tutorial. No need to repeat myself!

The only difference between the pleats in this dress and the rest of the tutorial is I made them narrower, and to do this, I put a small pleat under the back pleats, as seen in this entry on a cotton sacque at The Sign of the Golden Scissors.

Cotton Print Sacque 1

The back is pleated, the side back pieces sewn on, and it's ready for the side skirt to be pleated in the above picture.

The side back pieces are quite simple to sew on. I like to start them about an inch above the lining (wiggle room is always good!), then just sew with a running stitch to the hem.

The side skirt on this sacque is different than the chocolate francaise. While that skirt was straight, the pieces of this skirt are gored. The back of the skirt is straight, and the side piece has one straight edge and one gored edge. The straight edge of this piece is sewn to the back skirt, and the gored side is sewn to front skirt, and left open for the pocket slit at the top. The front of the skirt is essentially a trapezoid, with two parallel gored edges. This makes much more sense with the pattern draft in front of you!

Cotton Print Sacque 3

The pocket slit will be on the gored edge of this piece. Hem that first. It's much easier when you pleat it! Just hem about 8 or 9 inches from the top. Then make stacked knife pleat as shown, with the hemmed edge of the pocket slit on the outer edge.

Cotton Print Sacque 4

Baste that into place. Later, you'll sew it to the lining, but basting it now makes it much less prone to wiggling out of place later on!

Cotton Print Sacque 5 Cotton Print Sacque 2

Tuck the pleats underneath the bodice back. Snip the bodice edge above that so that both the pleats and the bodice edge can lie flat.

And yes, these pictures are from opposite sides of the skirt!

Cotton Print Sacque 6

Now it's time for the front pieces. I cut these to the same size as my pattern pieces with a little extra seam allowance. Because of my figure, I didn't need to dart this piece, but they usually were darted. It'll be hidden by trim anyway! It's a figure specific thing, so look at a few originals (I do suggest that a lot, don't I?) and do what your figure needs!

I started at the back, and pinned the bodice piece into place, folding the edge under as I went.

Cotton Print Sacque 7

Then I continued down the front edge, pinning and smoothing as I went.

Cotton Print Sacque 8

Then I continued at the bottom edge, still smooothing...

Cotton Print Sacque 9

Then, up the back. Still smoothing, of course! It should extend just past the back pleats. Don't worry about following your lining's seamline. Just make an attractive angle.

And now, sew all that down! I used a spaced backstich and point a rabbatre sous le main. A much easier stitch than it sounds, really :)

Cotton Print Sacque 10

And now, the skirt! It's topstitched on based on an example in Fitting and Proper.

Hem a few inches of the front edge opening, or turn it under as if you were going to hem it. Then fold the top edge over, and pin it to the front of the skirt. Now, the front panel is slanted, so you need to make the fold deeper at the opening of the skirt than the side seam. Here's the fun part--play with the pleat until your skirt hangs correctly.

Cotton Print Sacque 11

Now you're going to make a stacked pleat to mirror the back pleat. Again, the pocket slit should be hemmed. To do this, I just pinned the first pleat, then continued making pleats over that. Once the pleats are done, pin the rest into place.

Cotton Print Sacque 12

The kind of finished skirt pinned on! It just needs the stacked pleat. I initially read the draft incorrectly, and then forgot to take a picture of the correct way! With the extra pleat, it didn't hang right over the pocket hoops. Uh, oops? :)

Cotton Print Sacque 13

Then take the dress off the form, line up the skirt side so it's even, and sew the skirt side seam!

Untitled Untitled

And here's the finished dress! Admittedly, much was skipped in this part of the tutorial, but it is all covered elsewhere!

Robings--I left robings off this dress. It looked like some originals were done this way, and my fabric is a quilting weight cotton--I really didn't want to add extra weight. Here's my Pinterest board of cotton sacques

Now, if you want robings, you can make them like the ones on my anglaise, or you can cut the bodice piece extra wide, and then make them like on my chocolate francaise, except, of course, just bodice length. I was going to do that on the yellow sacque I just made, but make a cutting mistake and did it like the anglaise. Oops. both are period, right?

The stomacher--This dress has a compere opening--basically a split stomacher that closes with buttons. To make it, I traced the stomacher I made in this tutorial, and added a little overlap in the middle.

Sleeves--The sleeves on this are sandwiched between the lining and the outer fabric. I initially made them with the sleeve cap on top, but then I decided I wanted the narrower trim many original sacques seem to have. I have two sets of sleeve instructions up. these are the more detailed, and these show sleeves covered by robings on my chocolate francaise.

I believe this covers everything! For some reason, writing this one didn't come easily, well directions are never easy, but even less easy than usual! So please, if you have any questions, ask them! I do want these tutorials to be very, very helpful! I've already edited my anglaise tutorial based on a question, and I found an unclear spot in my francaise tutorial today as well. So please, do ask!